Welcome to AIVision Lite
Product Introduction

AI Vision Sensor is an intelligent vision sensor for LEGO Education and Makers, with 9 built-in AI models, supporting:
- Object Detection (80 categories)
- Advanced Classification (returns coordinates)
- Face Recognition
- Text and Number Recognition
- Pose Detection
- QR Code / Barcode
- Color Recognition
- Object Tracking
- Line Following
It not only allows children to get started easily from elementary school through the Scratch programming interface, but also seamlessly connects with mainstream controllers such as LEGO Spike, EV3, Arduino, micro:bit, easily integrating into maker and educational scenarios, combining software and hardware for fun learning.
Technical Specifications
| Parameter | Description |
|---|---|
| Processor | RV1106G3, 1.2GHz 1TOPS NPU computing power |
| BLE&WiFi | ESP32-C3 |
| Camera | 300W, low-light camera, adjustable focus |
| Power Supply Voltage | 5.0V |
| Current Consumption | Peak about 300mA @ 5.0V; with WiFi off, peak about 200mA @ 5.0V |
| Connection Interface | SPIKE, EV3, UART, I2C, GPIO |
| Built-in Functions | Object Detection / Classification / Text & Number Recognition / Face Detection / Target Tracking / Pose Detection / QR Code & Barcode / Color Detection / Line Following |
| Dimensions | 66mm × 29.5mm |
| Battery | 3.7V lithium battery, 1800mAh, battery life about 4 hours (battery version supported) |
Power Supply
Battery Version
- USB Power: Automatically charges when powered by USB; RGB light turns red when charging, green when fully charged
- Interface Power: Refer to the interface description section for pin numbers, pins 3 and 5 can both supply power
- Battery Power: When inserted into LEGO host, battery automatically supplies power, can set priority mode in software
- Multiple Methods Parallel: Supports USB + Interface + Battery simultaneously
No Battery Version
- USB Power
- Interface Power
- Both can supply power in parallel
⚠️ Note
- Please ensure sufficient power voltage and power, otherwise the device may malfunction.
- Battery power has priority, currently only switches interface pin 3 power, pin 5 power cannot be switched
Connection Guide (Two Ways to Connect the Device)
Method 1: Type-C Connection (Firmware ≥ 1.0.8)
Connect the device to your computer using a Type-C cable.
The cable must support data transfer.Open console.robot-code.com in Chrome (recommended).
The first load may take a little longer. Click the red button
A dialog will appear. Select the device shown below
On Windows, the device will appear as COMx.Click the Connect button in the dialog.
If the button turns green, the connection is successful. For other situations, please follow the on-screen instructions.After connecting to the device, go to
Settings → Advance Settings
in the left menu and check the resolution.
- If the resolution matches your computer system, go to Step 5
- Otherwise, select the correct resolution for your system
It is recommended to choose a lower resolution so that when using Method 2, you will not need to change it again.
After selecting the resolution, click the Confirm button at the bottom.
The device will restart automatically.Click
Code → code1
in the left menu.
In the top-right corner you should see the video stream.
You can also click the Refresh button next to Live to reload the video.
Method 2: Connect Using the APP
Download the APP from the official website.
If you encounter installation issues, please refer to the last section on this page:
REQ – App Installation Issues
If none of the solutions work, your system may not be compatible.
In that case, try connecting with another device.
After opening the app, click the red Bluetooth button → Scan Device.
The device will appear with the default name:
visible-sensorEnter the password (default:
000000)After a successful connection, the button will turn green.
Click the green button again to disconnect.Connect Wi-Fi and display video
After connecting to the device, go to:
Settings → Wi-Fi SettingsThere are two modes:
Normal Mode
- The device connects to your router
- Your computer must connect to the same router
Hotspot Mode
- The device acts as a Wi-Fi hotspot
- Your computer connects directly to the device’s Wi-Fi
You can try switching between these two modes.
⚠️ Important:
After switching modes, you must restart the device, otherwise the connection may be unstable.After Wi-Fi is enabled, go to:
Settings → Device InfoCheck the Device IP address and Local IP address.
They must be on the same subnet, otherwise the video stream will not appear.
Go to:
Code → code1Click the Refresh button next to Live.
The video stream should appear.
If the video does not appear after some time, check the following:
a. Resolution
Set the resolution to 800 × 480.
Do not choose a large resolution, otherwise the bandwidth may not be sufficient.b. Check Step 5 again
Make sure the device and computer are on the same network subnet.c. Try Hotspot Mode
Connecting directly to the device hotspot may provide a more stable connection.
Modify Device Name

After modification, wait for about 3 hours for the operating system cache to refresh before it takes effect.
TIP
It is recommended to modify the device name immediately after first connection for easy identification.
Interface Description
LEGO Spike(45678) / 51515/ EV3
- Spike&51515: Connect as ultrasonic sensor, all functions currently supported by SPIKE are supported by 51515
- EV3: Insert into input ports 1/2/3/4
UART
| Pin | Function |
|---|---|
| 1 | TX (Transmit) |
| 2 | RX (Receive) |
| 3 | VCC (Level power supply, 3.3V or 5V) |
| 4 | GND |
| 5 | 5V power input (can omit if pin 3 is 5V) |
| 6 | NC (Not Connected) |
I2C
| Pin | Function |
|---|---|
| 1 | SDA (Data) |
| 2 | SCL (Clock) |
| 3 | VCC (Level power supply, 3.3V or 5V) |
| 4 | GND |
| 5 | 5V power input (can omit if pin 3 is 5V) |
| 6 | NC (Not Connected) |
GPIO
| Pin | Function |
|---|---|
| 1 | IO port (can set high/low level, high level voltage matches pin 3) |
| 2 | IO port (can set high/low level, high level voltage matches pin 3) |
| 3 | VCC (Level power supply, 3.3V or 5V) |
| 4 | GND |
| 5 | 5V power input (can omit if pin 3 is 5V) |
| 6 | NC (Not Connected) |
⚠️ Note
Pin 3 needs to be determined based on the external TTL level. If the external UART or I2C interface TTL level is 3.3V, then connect 3.3V. If the external TTL level is 5V, then connect 5V. When connected to 5V, it can also power the system, so pin 5 can be omitted; otherwise, 5V must be connected to pin 5.
Reference diagram, when placed as shown below, from top to bottom are pins 1, 2, 3, 4, 5, 6 
Model Market
It supports cloud-based model training, and the trained model is then uploaded to the device for use. Some detection models are currently available.
Model Configuration
Classification (Advanced Classification)
- Upload images/videos and frame select objects, name them for recognition
- Returns coordinates (some classifications cannot identify position, X1, Y1 return
(0,0)) - Maximum support for 10 categories
📝 The difference from detection:
- Detection currently only supports 80 categories, and different forms of objects in the same category will be detected as the same type. For example, cups, different cups will be detected as cups, while advanced classification can upload different cups for configuration, thus detecting different cups.
- If you need to detect objects other than the 80 types, detection requires cloud training to recognize, while advanced classification can directly upload images for configuration.
- Detection also has obvious advantages. Trained models are both accurate and efficient for detecting specific objects.
Face
- Supports upload / frame selection for configuration
- Can modify names
- Maximum support for 10 faces
Tracking
- Only supports 1 target, can upload up to 5 photos, corresponding to different directions of one target, names must be consistent
Color
- System built-in: Red, Orange, Yellow, Green, Cyan, Blue, Purple
- Can customize solid color targets. If custom colors are set, system colors will not take effect.
- Maximum support for 10 types
Line Following
- Only supports black lines
Voice (PRO Version Only)
- When using Custom Mode, you need to record command words and rename them so they can be used in the code.
Wi-Fi Settings
- Router Mode: Connect to 2.4G Wi-Fi, same network segment as PC
- AP Mode: Device hotspot, name matches device name. After PC connects to hotspot, internet connection will be unavailable
⚠️ Recommendation
After connecting to Wi-Fi for the first time or switching Wi-Fi networks, it is recommended to power cycle the device once to ensure a stable Wi-Fi connection.
Prioritize router mode, use AP mode only when signal is weak.
Advanced Settings
- Interface Protocol: Supports spike, ev3, uart, i2c. Usage methods refer to Lego Usage, UART&I2C Usage, GPIO Usage
- Power Mode (Battery Version): Priority External / Priority Battery, power switching does not interrupt device operation
- RGB Light Brightness: Adjust brightness (0-100), set to 0 to turn off RGB light
- Enable Lighting: Use RGB light as lighting. Settings are lost after device restart
- Bluetooth Password: Six digits, default
000000 - Resolution: 800×480 / 1072×640
- Factory Reset: Clear all configurations and all model configurations
Device Information
Displays App Version, Firmware Version, MAC Address and other information.
At the bottom, you can select a new version and click the Upgrade button for OTA upgrade.
Forgot Password
Use this function to reset the password when you forget the Bluetooth connection password.
Follow the App prompts to operate. After successful reset, the password is restored to 000000
Programming Interface
Right-click (long press on tablet)
code1, a dialog box appears, including: New, Copy, Rename, Delete.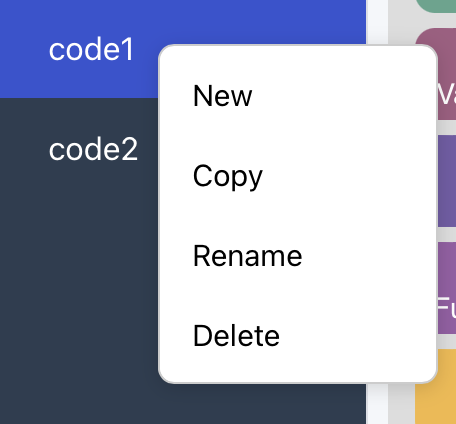
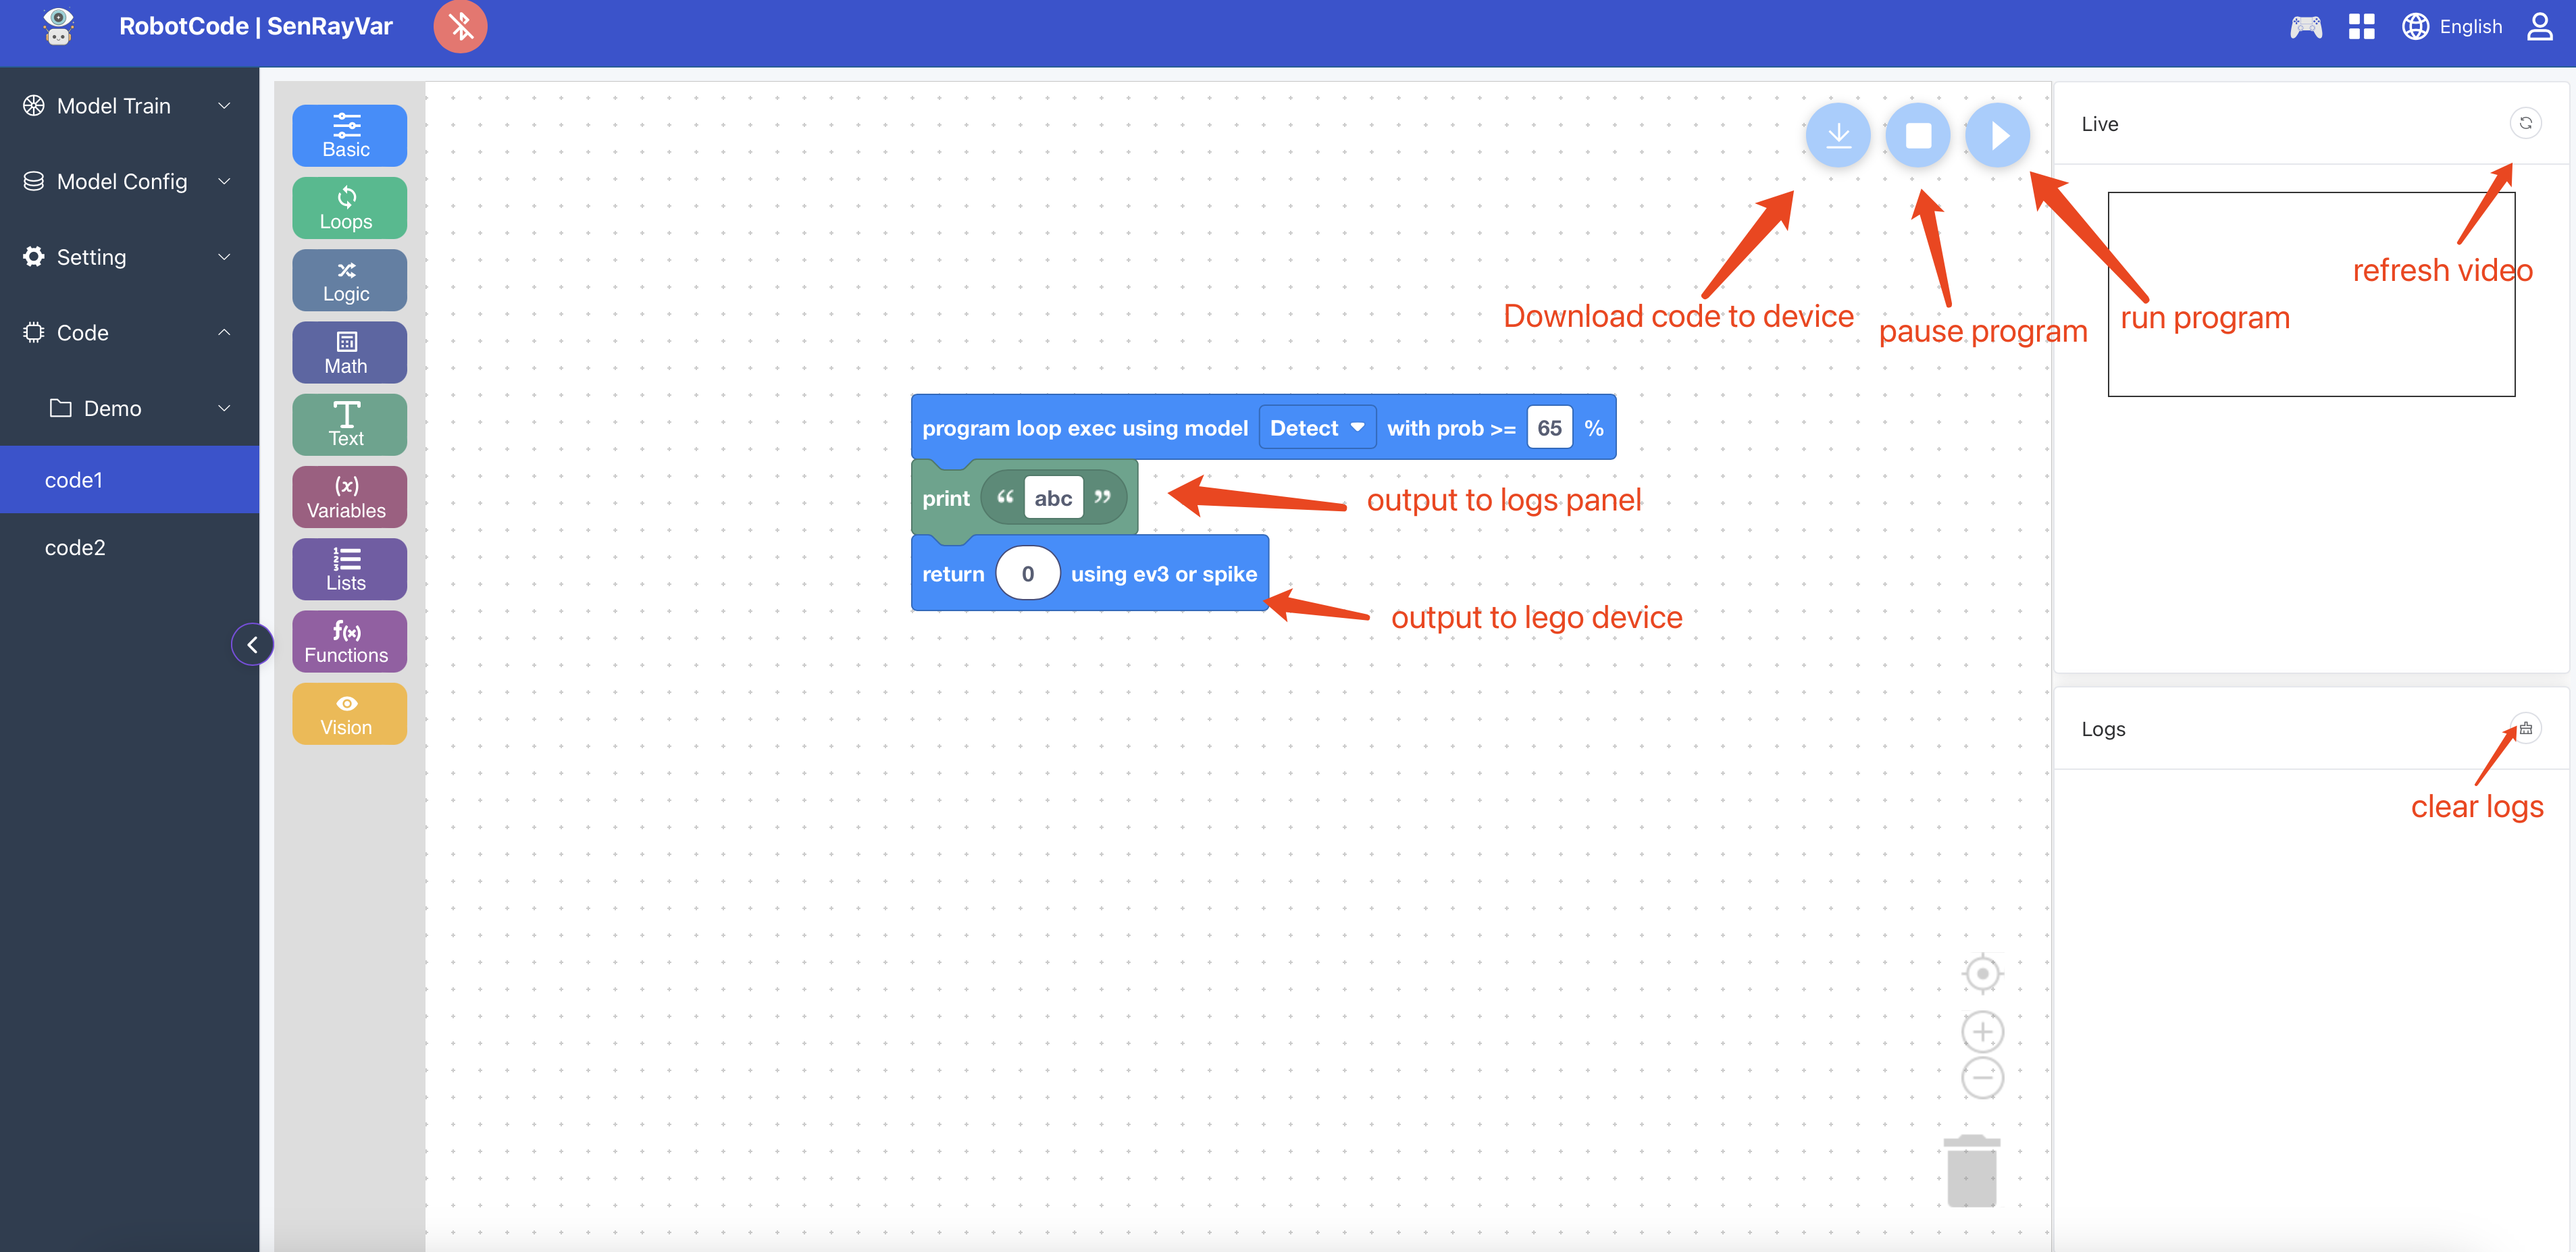
Interface Layout Description
- Top right: Display video
- Bottom right: Display logs
- Display area size can be adjusted by dragging the divider
⚠️ Note
If there are unused code blocks, please delete them all, otherwise submission will fail!
Log display has rate limiting, not every frame of data is printed,
Byte count [0, 50] 10 times/s, Byte count [50, 100] 5 times/s, Byte count [100, 500] 2 times/s, Byte count [500, 1000] 1 time/s. Over 1000 is truncated, only first 1000 characters are printed
Other Features
Remote Control
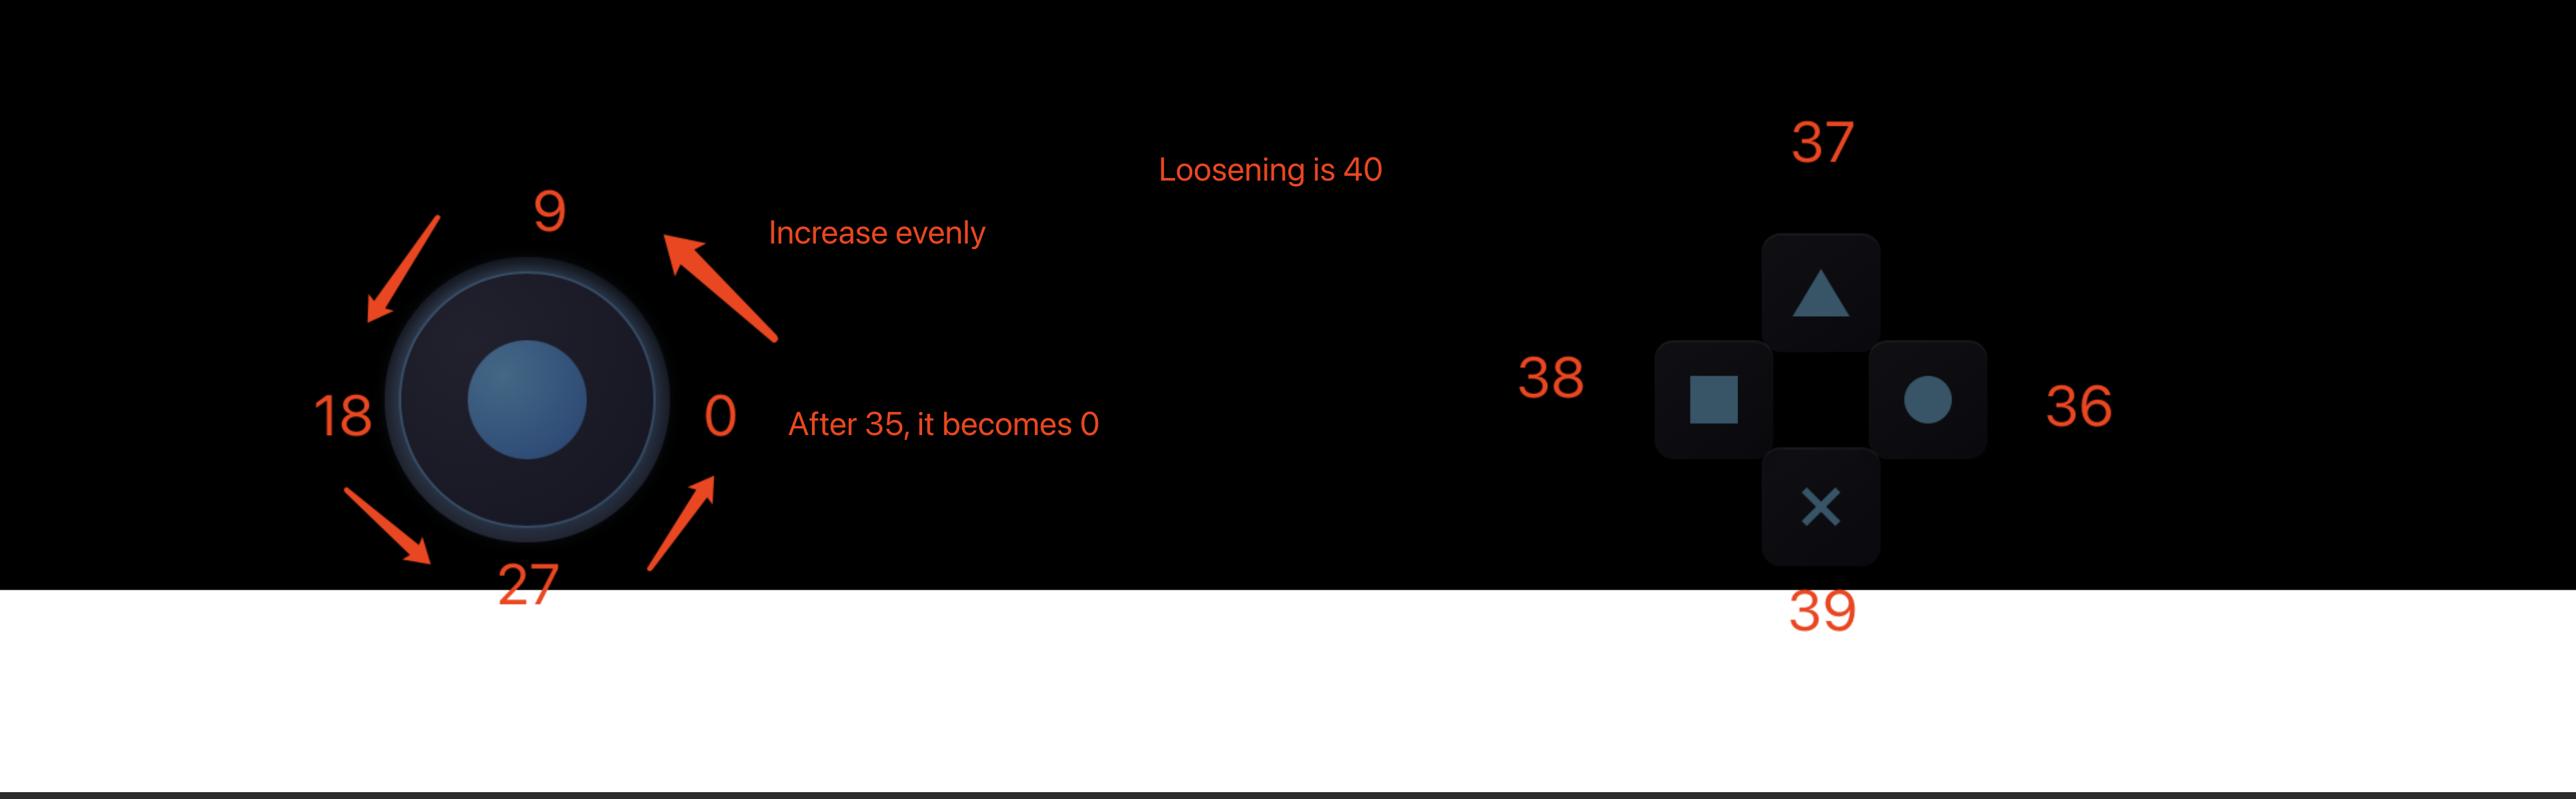 The receiver processes the accepted data according to the numbers above.
Code Import/Export
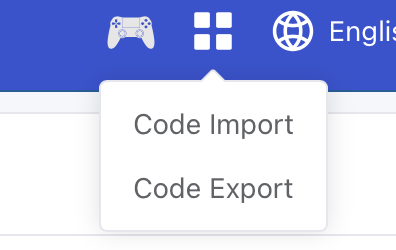
- Can choose Import/Export Code
- Save file format:
.bin - Generally exports to download folder
Language Switch
Currently supports Chinese / English
Programming Block Usage
Basic
Some of the most commonly used basic blocks.
Program uses specified model to loop execute...
- Usage: Program must start with this block and specify a model category and corresponding confidence.
Set model category and confidence
- Usage: Can dynamically modify model category and confidence during program execution.
Wait
- Usage: Put the program into sleep state.
⚠️ Note
Don't wait too long, to avoid the program staying in sleep state, preventing other operations from executing.
Received Command
- Usage:
- When SPIKE uses ultrasonic, it can notify AI Vision through the shape of the light, AI Vision receives commands through this block to achieve host control.
- EV3 interface does not have this function.
- UART/I2C can also achieve similar effects by sending commands.
EV3 & SPIKE Interface Return Data
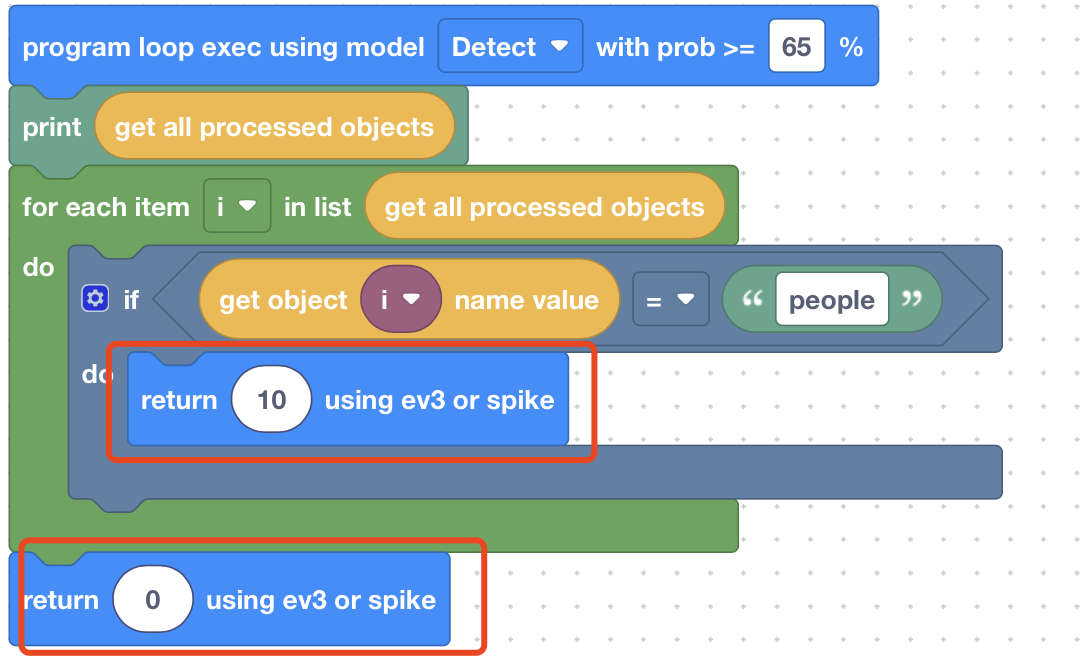
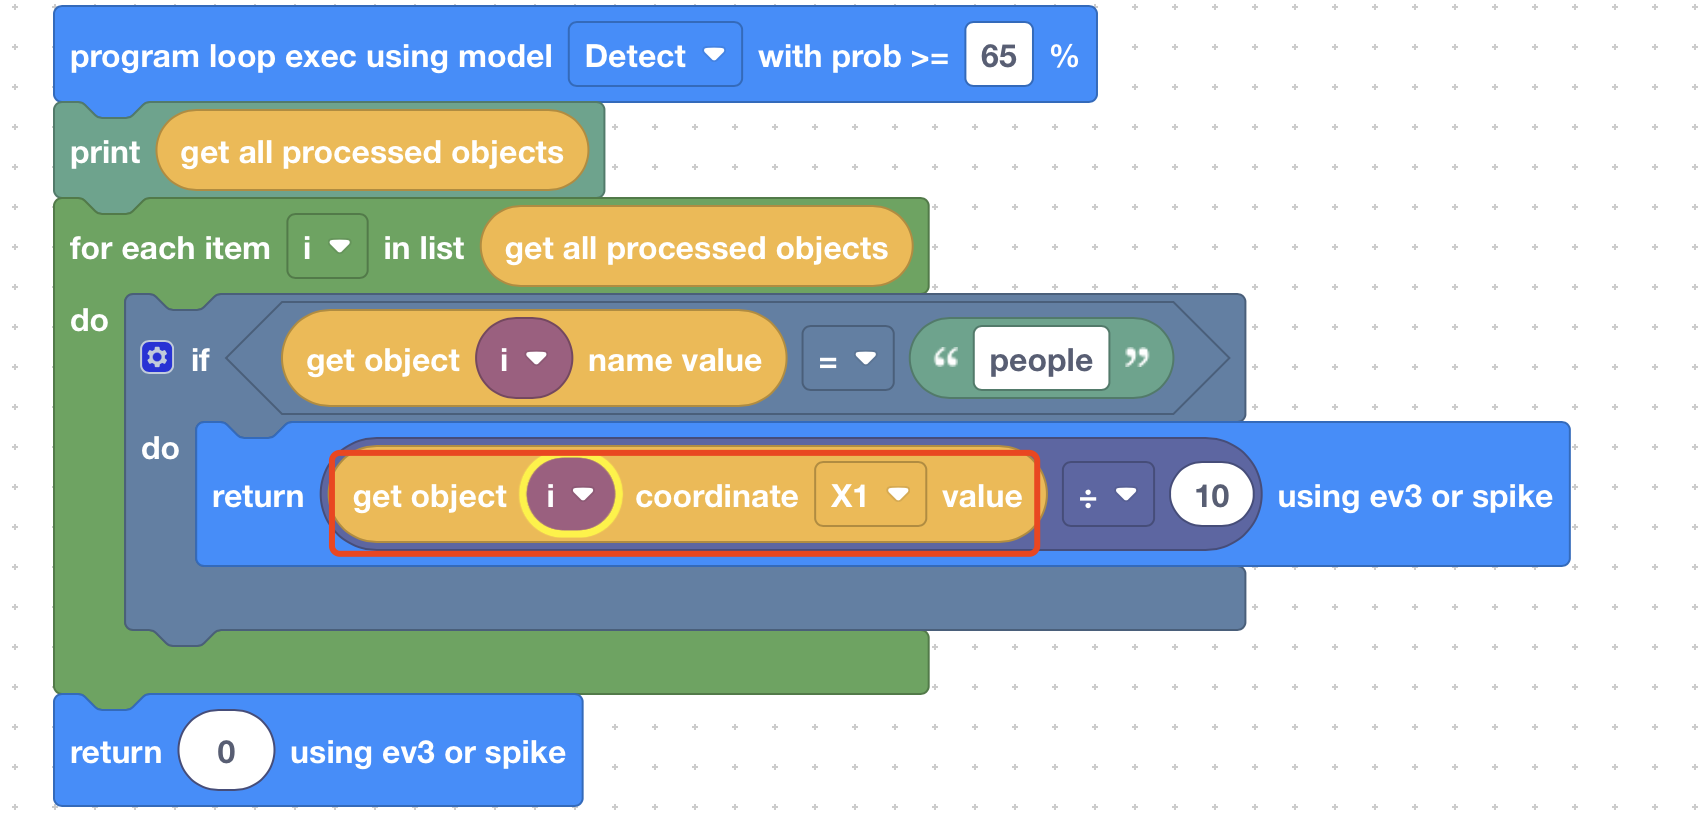
- Usage: When protocol is EV3 or SPIKE, use this block to return.
⚠️ Note
- Synchronous return value must be between 0–200
- When program executes this instruction, it returns immediately, i.e., does not execute other instructions.
- It is recommended to return data in all possible return branches.
UART & I2C Interface Return Data
Usage: When protocol is UART or I2C, use this block to return.
- If input is string, use
noneconversion:
- If input is object, use
jsonconversion: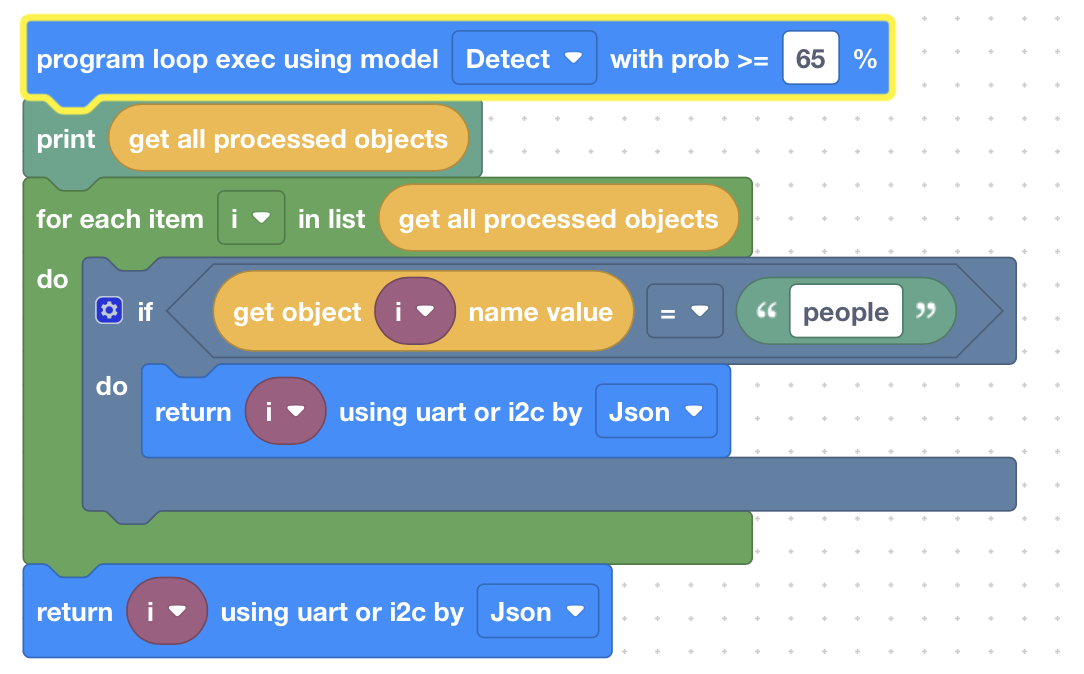
- If input is string, use
⚠️ Note
When program executes this instruction, it returns, i.e., does not execute other instructions. It is recommended to return data in all possible return branches.
Vision Class
Blocks related to vision detection and recognition.
Specified target exists
- Usage: Determine if a specified name target exists. Returns true if exists, otherwise returns false.
Get all detected targets
Usage: Returns all detected targets (list), need to loop through to get individual targets.
Example:

Get specified target coordinate values
Usage: Input target name or object, returns target bounding box coordinate values.
- Coordinate values use image top-left corner (0,0) as origin.
- For example, if resolution is 800×480, bottom-right corner coordinate is (799,479).
Coordinate Description:
- X1: X coordinate of bounding box top-left corner
- Y1: Y coordinate of bounding box top-left corner
- X2: X coordinate of bounding box bottom-right corner
- Y2: Y coordinate of bounding box bottom-right corner
Usage Examples:
- Using target name
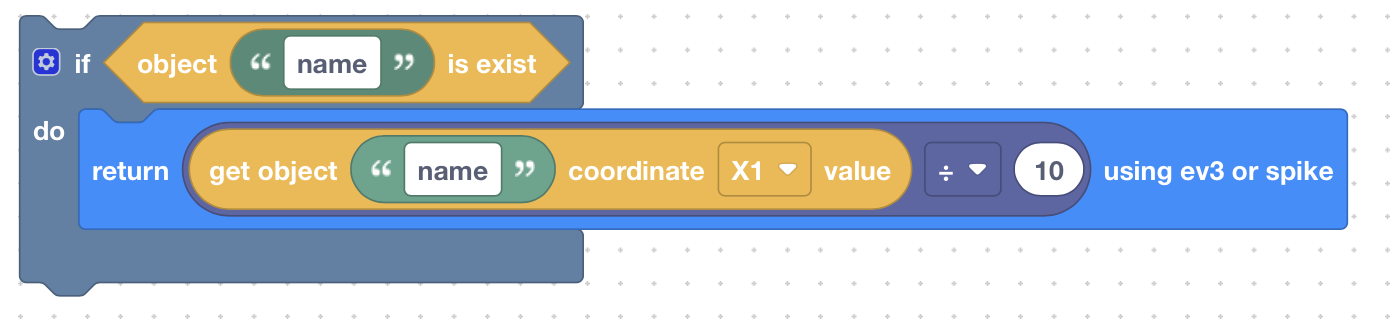
⚠️ Note
If there are multiple targets with the same name, only the first one is returned
- Using target object
Get specified target pose position coordinate values
Usage: Input target name or object, returns pose point coordinates (only valid for pose model).
- X: X coordinate of position point
- Y: Y coordinate of position point
Example:

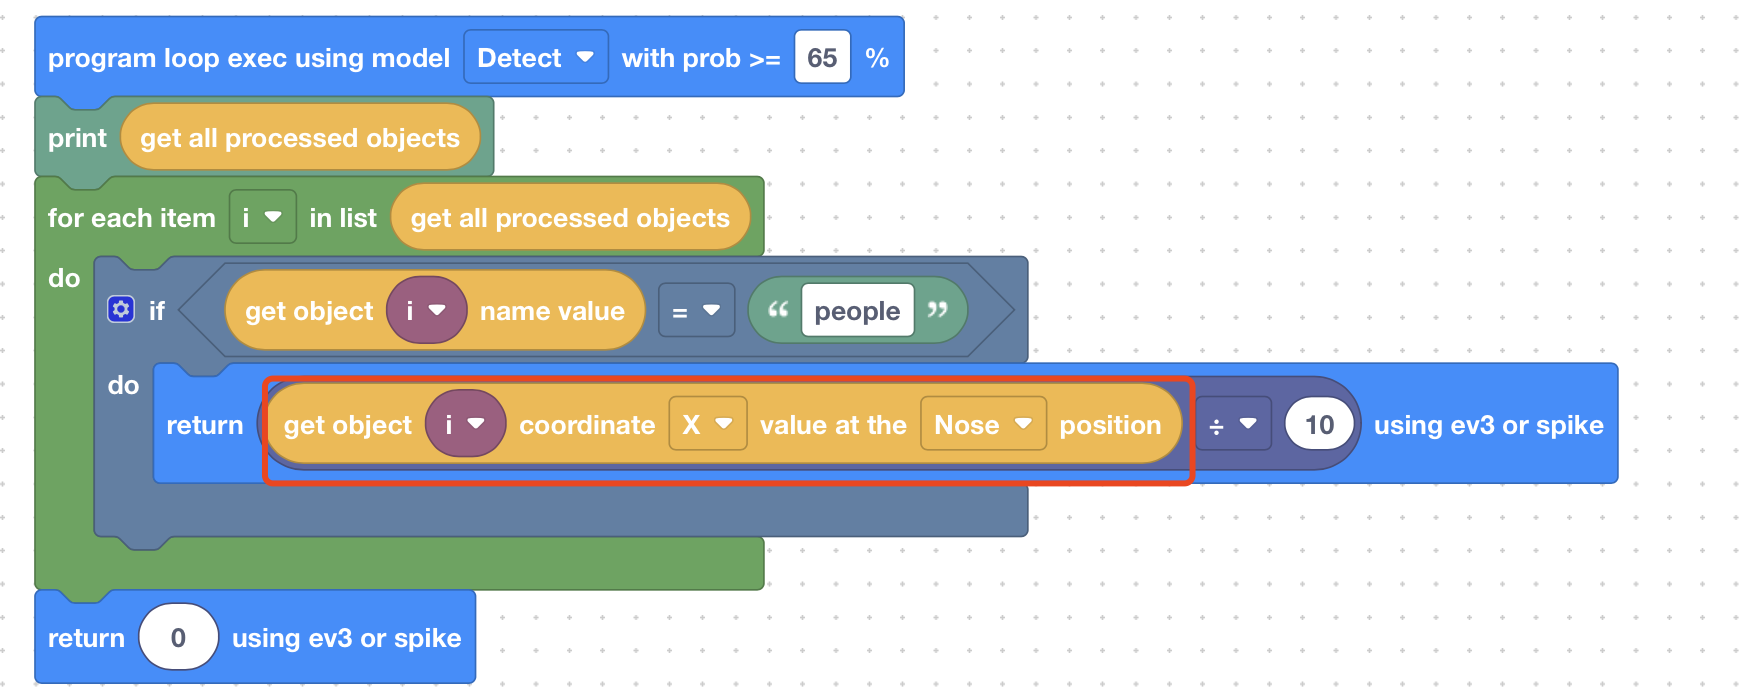
Supported Pose Points:
Nose, LEye (Left Eye), REye (Right Eye), LEar (Left Ear), REar (Right Ear),
LShoulder (Left Shoulder), RShoulder (Right Shoulder), LElbow (Left Elbow), RElbow (Right Elbow),
LWrist (Left Wrist), RWrist (Right Wrist), LHip (Left Hip), RHip (Right Hip),
LKnee (Left Knee), RKnee (Right Knee)
Get specified target name
Usage: Input target name or object, returns target name (may be model default or custom configuration).
Example:


Get specified target confidence
Usage: Input target name or object, returns matched target confidence (decimal between 0–1, 1 is maximum).
Example:


Voice (PRO Version Only)
Blocks related to voice recognition.
Enable Voice Recognition
- Usage: Enable voice recognition.
This command must be used before using voice recognition.
If using Custom Mode, you need to set the confidence threshold.
Get Voice Recognition Result
- Usage: Get the result of voice recognition.
The mode must match the one used when enabling voice recognition.- In Custom Mode: returns the name of the voice model configuration.
- In Auto Mode: returns the recognized speech text.
Check if Voice Recognition Is Finished
Usage: Returns Yes or No.
Voice recognition runs asynchronously, so results can only be retrieved after recognition is complete.
You can use this block to check whether recognition has finished.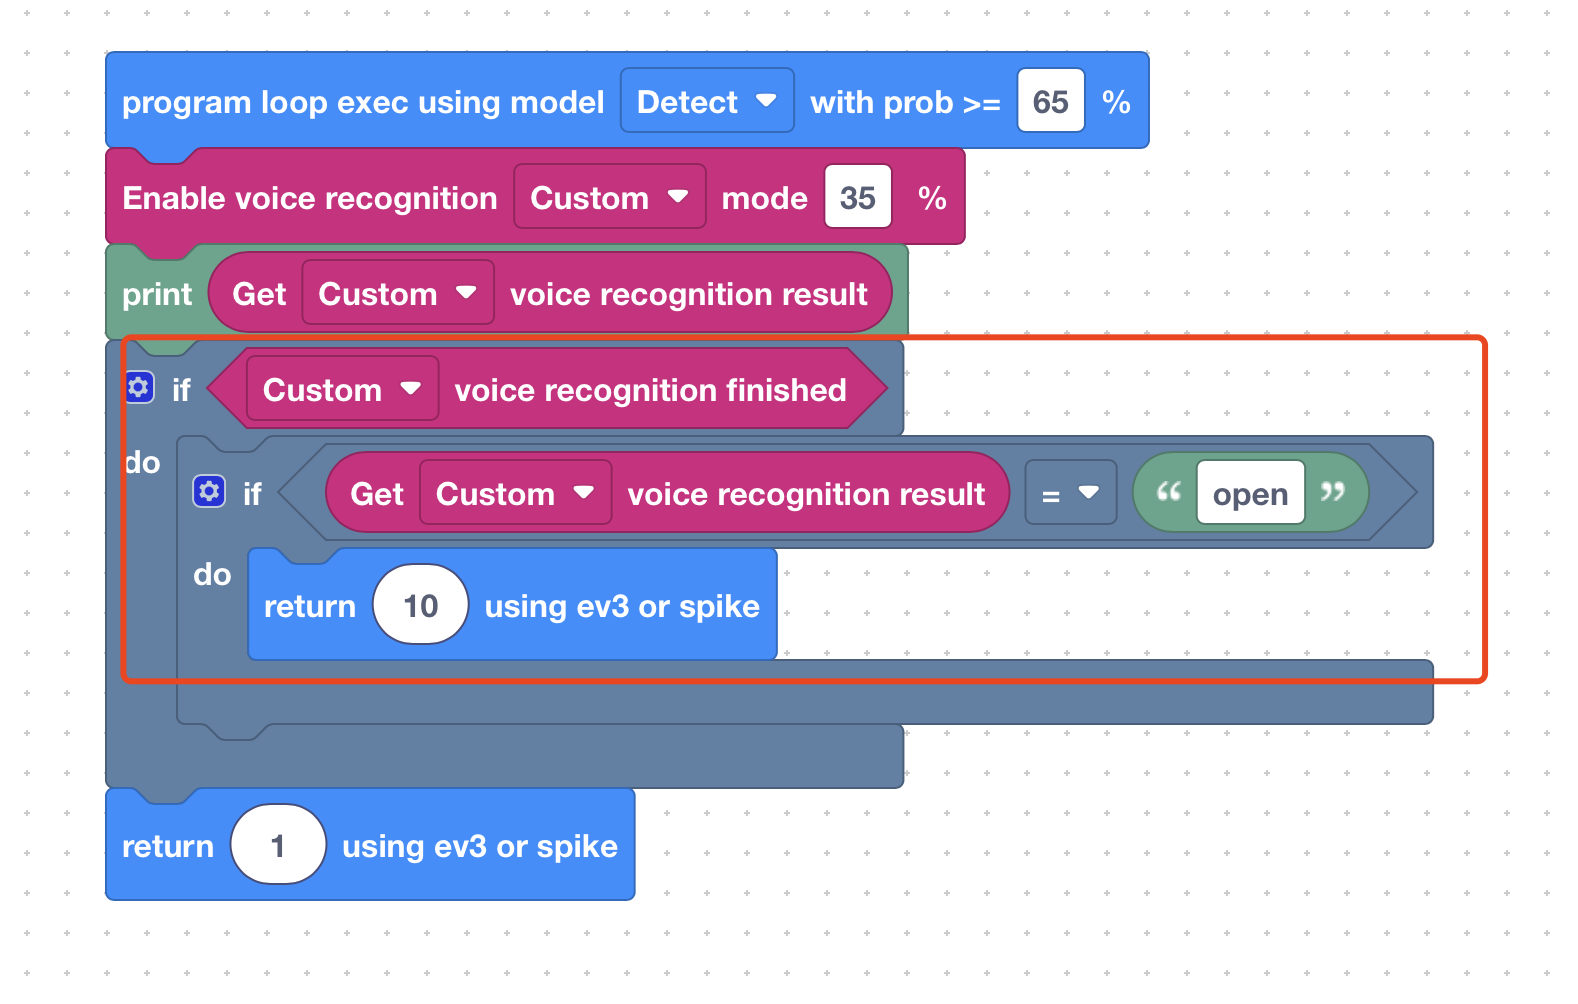
Get Voice Recognition Confidence
- Usage: Get the confidence level of the voice recognition result.
- In Auto Mode: the confidence value is always 1.
- In Custom Mode: you can adjust the confidence threshold in the Enable Voice Recognition block based on the printed confidence values.
Other Classes
Open APP reference usage instructions
Lego Usage
For SPIKE and EV3 application scenarios.
Prerequisites: Must select interface protocol as SPIKE or EV3 in advanced settings
SPIKE Application: Get AI Vision data (unit must be cm)

SPIKE Application: Send commands to AI Vision
(To view received values, can use output command in AI Vision to print)
EV3 classroom Application:
- Input port must be 1, 2, 3, 4
- Unit must be cm

pybricks Application:
- Unit must be cm
code example:
- Unit must be cm
from pybricks.hubs import PrimeHub
from pybricks.pupdevices import Motor, ColorSensor, UltrasonicSensor, ForceSensor
from pybricks.parameters import Button, Color, Direction, Port, Side, Stop
from pybricks.robotics import DriveBase
from pybricks.tools import wait, StopWatch

hub = PrimeHub()

dist_sensor = UltrasonicSensor(Port.A)
distance_mm = dist_sensor.distance()
# convert to cm
distance_cm = distance_mm / 10
print("value:", distance_cm, "cm")
⚠️ Note
When LEGO gets sensor data, it always gets the most recently received data. For example, if one frame sends data 10, and the next few frames don't send return data, the read data will always be 10 until the next time data is received. So it's recommended to also send return data when not processing data, to distinguish.
UART & I2C Usage
Prerequisites: Must select interface protocol as uart or i2c in advanced settings
Receive Protocol
// Byte[0] = 0x88, Byte[1] = 0xEE
// Byte[2-3] = Data length (uint16, little endian), len = Byte[2] | Byte[3] << 8
// Byte[4..] = Data content, length is len
// Byte[4+len] = CRC checksum data, starting from Byte[4], length is len
uint8_t calc_crc(const uint8_t *data, size_t len) {
    uint8_t crc = 0;
    for (size_t i = 0; i < len; ++i) {
        crc ^= data[i];
    }
    return crc;
}
GPIO Usage
Prerequisites: Must select interface protocol as gpio in advanced settings
Receive Protocol Use ev3/spike return data command to set high/low level, value correspondence:
0: Both pins 1 and 2 are low level.
1: Pin 1 is high level, pin 2 is low level.
2: Pin 1 is low level, pin 2 is high level.
3: Both pins 1 and 2 are high level.
REQ
Application Installation Issues
iOS Version Limitations: Wi-Fi video calling is not supported in iOS versions prior to 16.7; it is supported in versions 16.7 and later.Windows: If you encounter a spinning loading screen, try running it as administrator (right-click and select "Run as administrator") or installing it to the D drive directory. If the app crashes, please check if Microsoft WebView 2 is installed and if it supports Bluetooth.
RGB Light Color Functions
Red: Battery charging
Green: Battery fully charged or normal state without battery
Yellow: No cameraCannot Scan Device
Prioritize restarting APP, if still doesn't work, unplug device power to restart device.
If it's a spike device, observe if the light is white, if so, the battery has no power and needs chargingCannot Display Video
- Check if PC network and device network are on the same LAN (device only supports 2.4G)
- If the above is correct and still doesn't work, use AP mode connection, after modifying AP hotspot, power off and restart device, PC connects to device hotspot, click refresh to try
- If the above still doesn't work, check if the program has issues. Currently the program execution logic is that each frame of image goes through program processing, after program processing completes, it's sent to PC for display. If there's an infinite loop or long sleep in program processing, it will also cause image frames not to be output to PC. For example, the code below will cause the program to sleep for a long time, thus causing no images
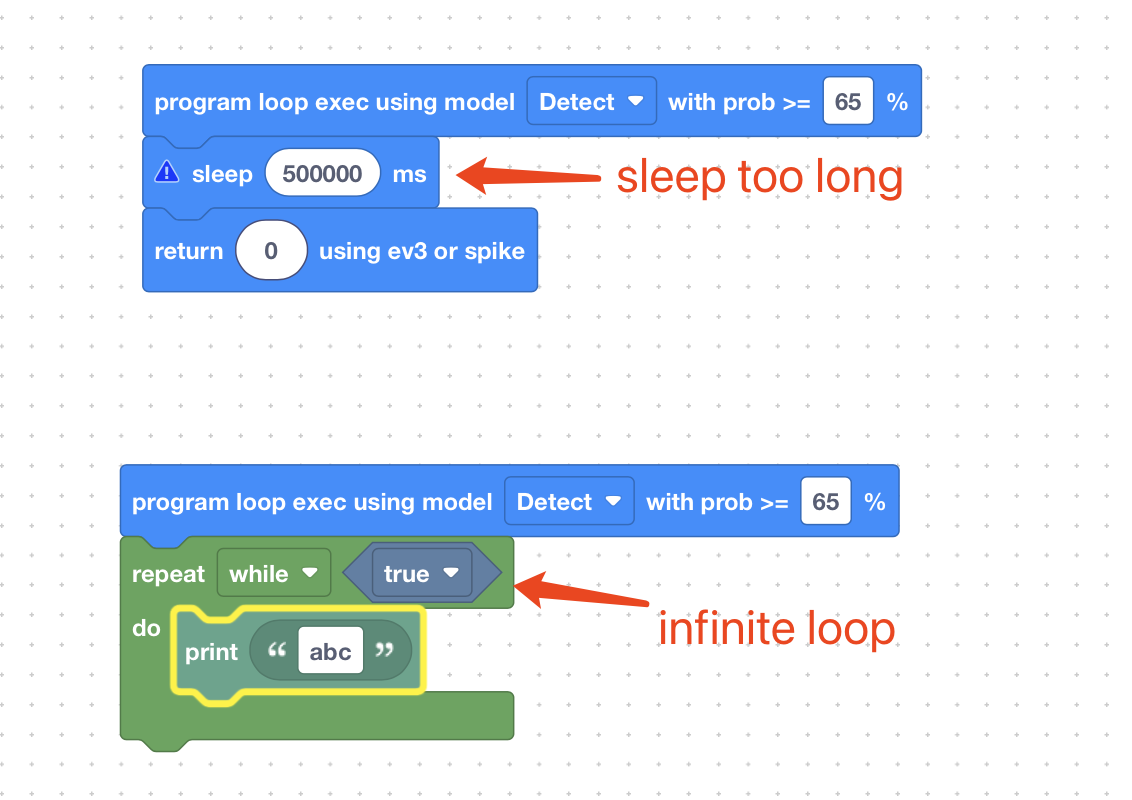 In this case, need to modify code, download to device, wait 10S, then power off and restart device.